How to Create Banding Trim and Add It to Furniture and Home Decor
By A Mystery Man Writer
Description
Want to elevate your home decor? Learn how to add banding trim to items like pillows and draperies and create designs that have a no-sew banded layout!
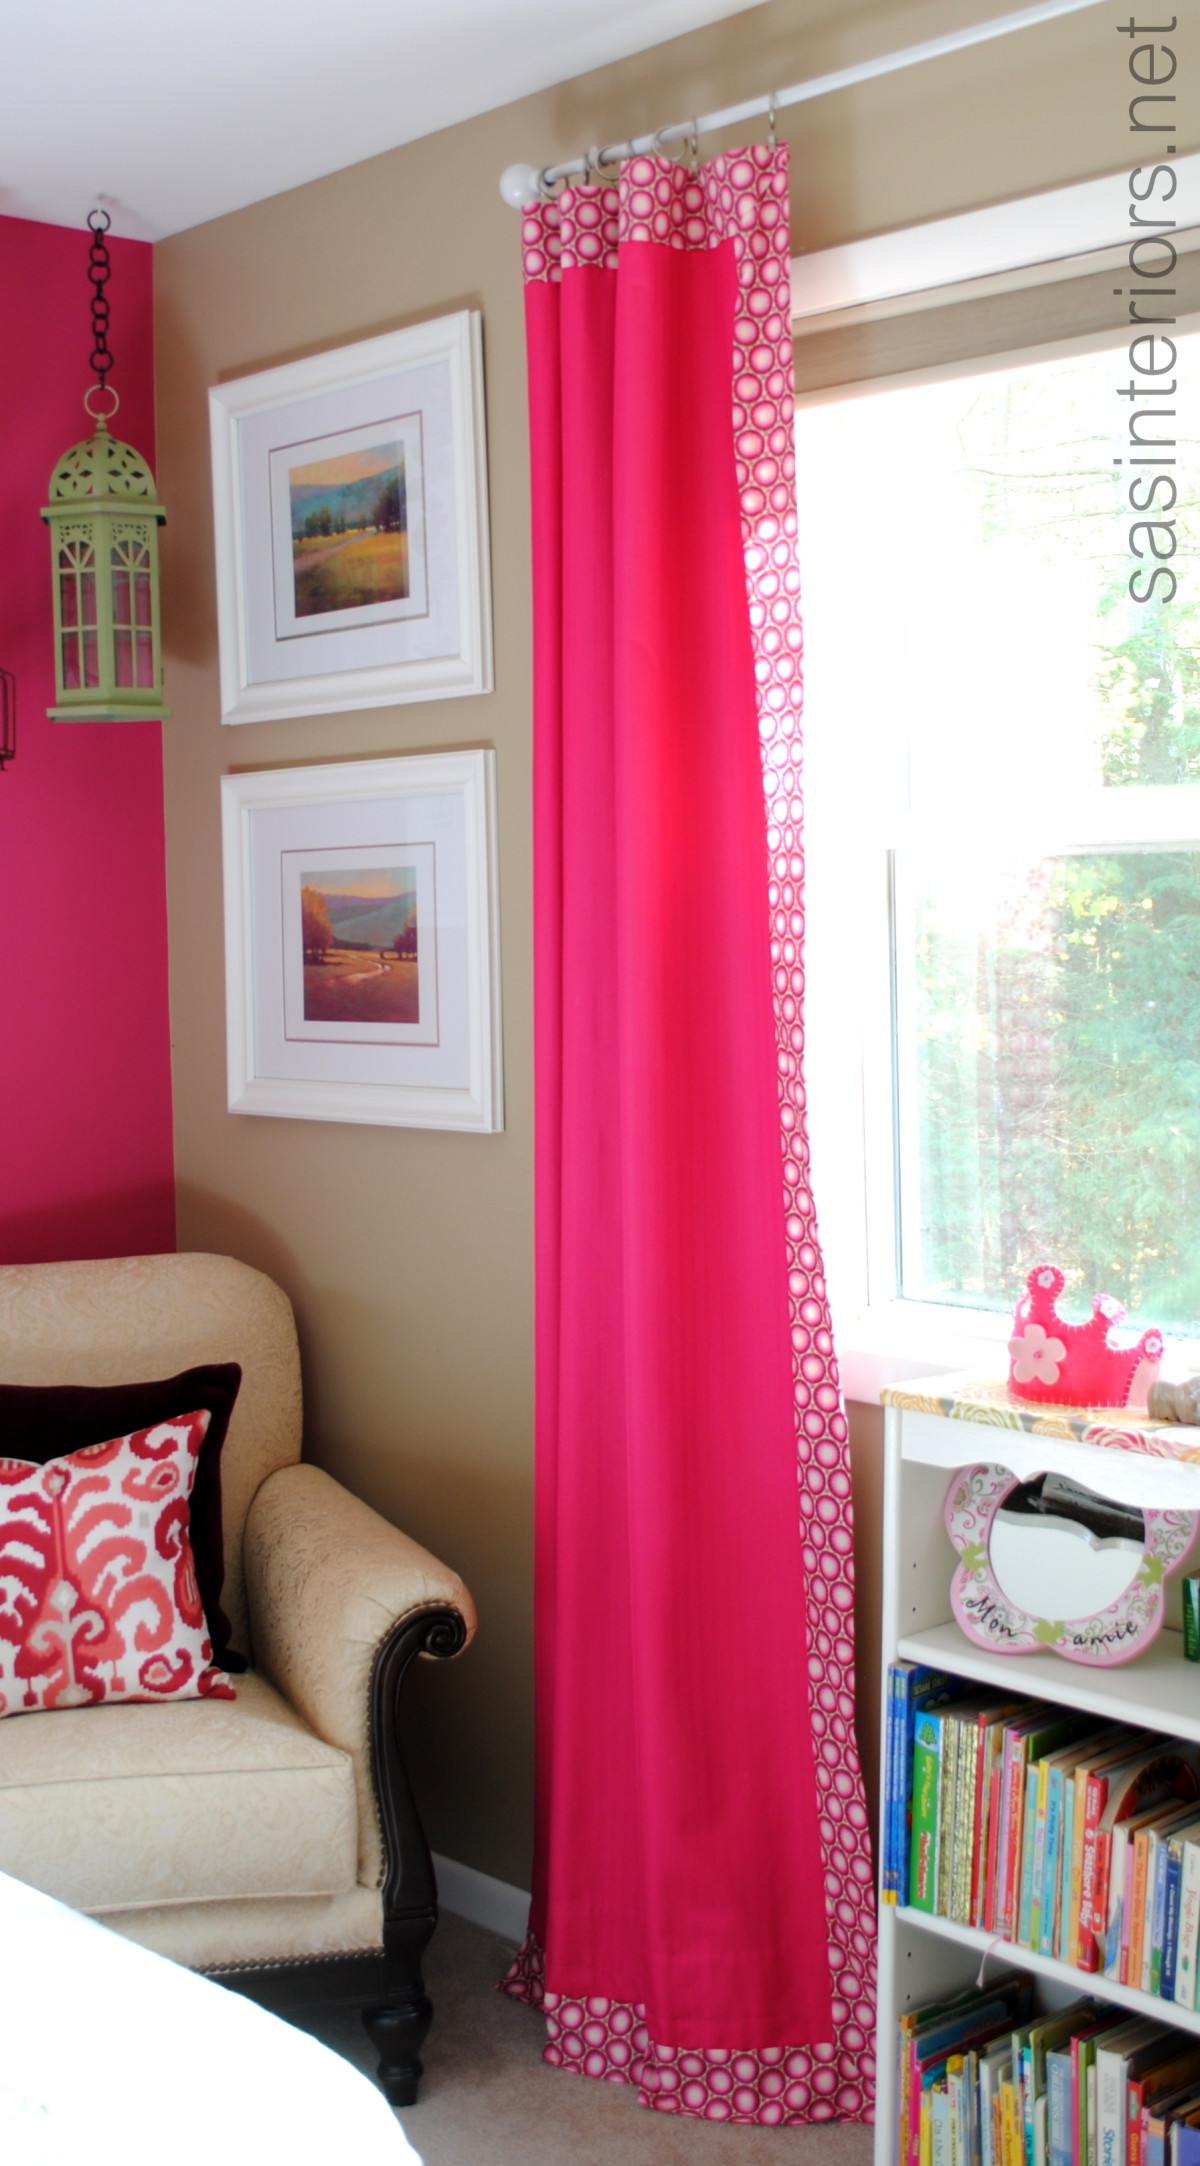
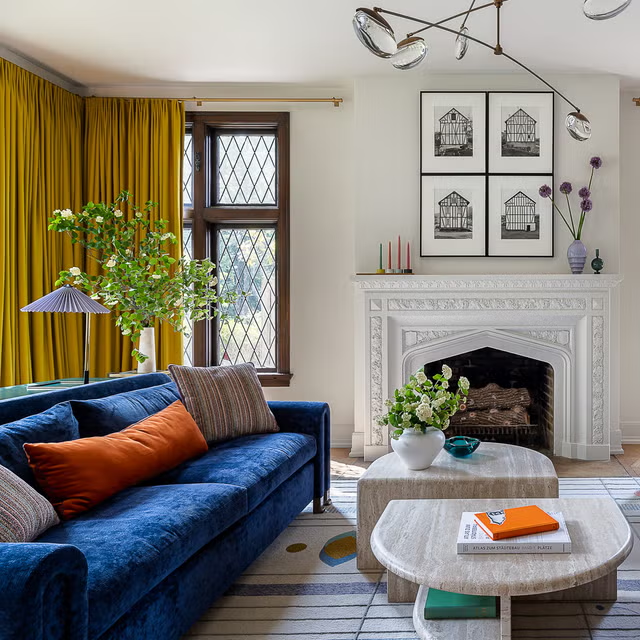
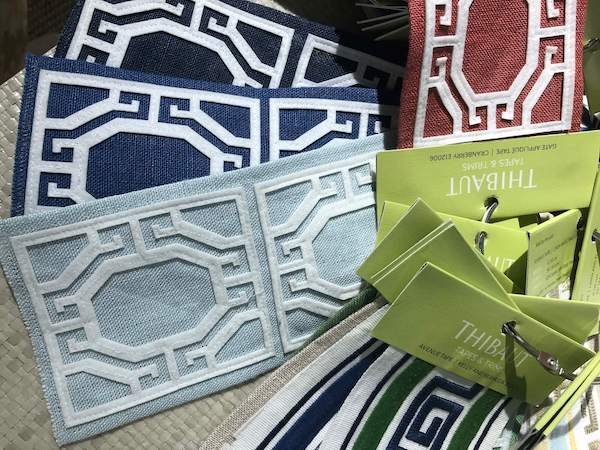
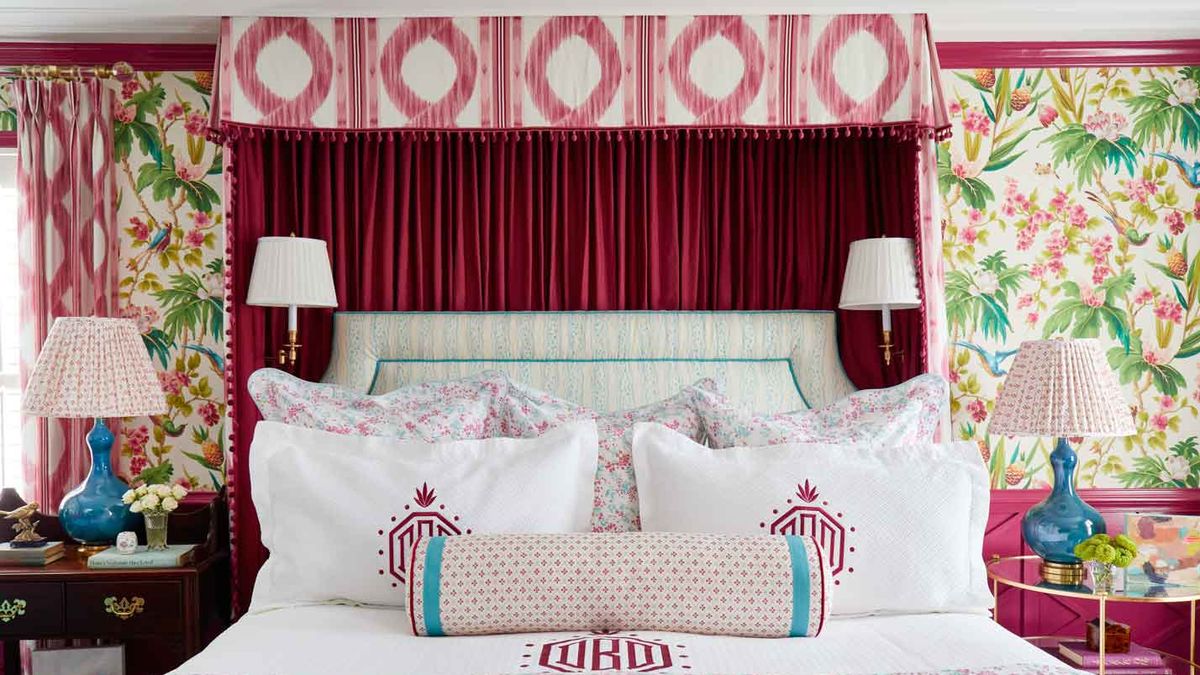
Ready to add some extra customization to your interior design? Spoonflower Ambassador Danika Herrick shares how you can add fabric trim to furniture and home decor two different ways! For sewing and design beginners, she'll walk you through creating fabric trim out of Spoonflower designs, which you can sew directly on to items like pillows and draperies. For more experienced designers, Danika explains how to add a no-sew banded layout to your designs using Adobe® Photoshop®. Or if you're feeling adventurous, why not test out both methods? With these next-level creative skills under your belt, you’ll be creating show stopping home decor in no time flat! Pillow and slipcover with added banding trim. Featured design: Custom Blue Charlie Star Stripe by danika_herrick Danika: I love to add a banded trim to my draperies, pillows and furniture. It creates a timeless, tailored look and elevates your project by making it feel custom. There are so many great banding tapes available these days, but they can get outrageously expensive. Quite often one yard of banding costs more than a yard of fabric! I started creating my own homemade banding tape through Spoonflower, using patterns that can be cut and applied directly to my projects. In this double tutorial post, I’ll share both the simple beginner method I use to create yards of banding, as well as a more advanced hack to create templates for custom “no sew” banded pillow and window treatment layouts. Being able to customize designs will give you endless options and level up your designs with very little effort. Featured design: Custom Berry Vine Pink Banding by danika_herrick. Image courtesy of Anne Anderson How to Create Basic Banding Trim Skill Level: Beginner To make basic banding tape you will first want to choose a design. You can design your own or choose from thousands on the Spoonflower Marketplace. Stripes are my go to since they can easily be cut apart and are very straight forward and easy to use. But don’t let that limit you—solids and prints can also work! I highly recommend ordering samples of designs you think might be interesting, then trimming them into strips to test their scale. If the scale isn’t quite right, some Spoonflower designers will adjust the scale of their design if you ask them. Once you have a pattern chosen, determine how much yardage you will need. To do so, measure the perimeter of the banded area and calculate how many strips of fabric you will get from each width of fabric. For small projects like pillows, you can usually get away with ordering one yard of fabric and seaming the strips together. For larger projects like draperies, I suggest ordering fabric the length of the drapery panel so your banding will be one continuous strip with fewer seams. Most average curtains will work with three yards of fabric. Featured designs: Custom Blue Charlie Star Stripe and Large Pearl's Bouquet Quiet Blue Green by danika_herrick Featured design: Custom Blue Charlie Star Stripe by danika_herrick I chose this Star Stripe to create a tailored pillow and banded slipcover skirt for my club chair. To create the banding for the pillows, I need to cut the stripe into strips, leaving 1/2-3/4” (1.27 cm-1.91 cm) extra along each edge to fold under. I use a clear ruler as my guide and cut the fabric with a rotary cutter. Next I fold the edges of the strip under to create a simple blue banding of stars and press it in place with an iron. That’s it! Once I’ve cut and pressed the banding, I attach it to my pillow face. This technique will be the same for any project—whether it’s Roman shades, a duvet, a dust ruffle or draperies. This process requires placing and pinning your newly pressed banding onto your project of choice, just as you would with regular banding tape. If you are doing a straight run of banding with no corners or turns you can skip steps 2 and 3 below as they demonstrate how to create a basic mitered corner. Lay your fabric flat, making sure it is smooth and pressed. I use a clear ruler as a guide to create any inset. I want my banding set 1 1/2” (3.81 cm) in from the pillow’s edge, so I set my guide at 2” (5.1cm), which allows for a 1/2” (1.27 cm) seam. Next I lay the banding in place, pinning it in the center and working out towards the corners. When you get to a corner you will need to make a mitered edge by creating 45-degree folds. Place a pin in the outer corner to hold the fabric steady and fold it back on itself. Next, fold the fabric forward at a 45-degree angle, creating a mitered edge. Pin it in place and press with an iron. Continue pinning the banding to the fabric, repeating this step with each corner. When you get to the last corner, trim your banding to be 3/4” (1.91 cm) longer than needed and hide the unfinished edge into the miter fold. Sew the banding to the face by stitching closely along the edge. I like to use a zipper foot so I can get as close as possible to the edge, working my way all around the entire banding until it is secure. The final result is a crisp banded pillow. How to Design a “No-sew” Banded Layout with Photoshop Skill level: Advanced You might have noticed the stripe pattern I chose for these projects has a lot of space between the stripes. This was an intentional choice because I wanted to leverage that extra space to create an easy skirt for the bottom of my slipcovers. This brings us to the next hack—creating “no-sew” bandings. I could have easily attached the banding to my slipcover’s skirt in the same manner I did the pillow, but because I can customize and create my own designs on Spoonflower, I deliberately spaced my stripes far apart. My chair was going to need an 8” (20.32 cm) skirt, so I simply cut my stripes into 10.5” (26.7 cm) wide strips, hemmed the bottom edge and applied the entire strip as the skirt. I love to use this hack because it saves me so much time sewing! This technique requires spacing the repeat of my stripes to a desired width; it works great for creating dust ruffles and skirting. You can also leverage this idea further to create custom banded pillow and window treatment templates. Please note, this does require some Photoshop skills. Featured designs: Tulip Indienne Stripe Blue Lilac Terracotta and ANDREW STRIPE Cerulean Blue and Berries by danika_herrick I’ll walk you through the basics of creating a banded pillow, but the same rules would apply for a Roman shade or drapery panel. You’ll be creating a canvas the size of your unfinished (unsewn) project and then uploading to and printing it with Spoonflower. 1. Begin by determining your pillow size, including your seams. My finished pillow will be 26” (66 cm) and I will have 1/2” (1.3 cm) seams, so my final size is 27” (68.6 cm). Create a new file in Photoshop in those dimensions being sure to set the resolution to 150 dpi. 2. You will need to create the banding design you want to use prior to this. Save it as the width you want it to print and make sure it is as long as the length of your canvas. I am using my Star Stripe design again and have placed it as a new layer in my file. In Photoshop, the steps to do this are: File > Place Linked > (choose file) > Place. Determine where you want to inset your banding from the fabric or design edge and add in your seams or hems. As I want this banding to be close to my pillow edge, I’m only going to set it in 1” (2.54 cm) from my edges. Using the Rectangle Tool, create a 1” (2.54 cm) wide shape and duplicate it 3 times so that you end up with 4 rectangles. Photoshop steps: Command + J on a Mac/Control + J on a PC x 3. Click each layer and move the rectangles to all 4 sides. I made my rectangles blue so I can clearly see them. 3. Duplicate your stripe layer 3 times. Photoshop steps: Command + J on a Mac/Control + J on a PC x 3. Move and/or rotate each stripe so that it’s aligned against the edge of each rectangle. 4. For stripes containing patterns, you might need to adjust these further for mitered corners. Note how the stars in my corners of the last pictures almost line up, but not quite. I simply click on each stripe and transform them individually, stretching or shrinking them so the corners line up and look neater. 5. Now you need to miter the edges. Using the Polygonal Tool I draw a line through the corner, containing the excess of the top stripe I want to remove. Be sure you have that layer selected and press the “Delete” key. 6. To remove the excess stripe below, click on that layer and then choose Select > Inverse. The area outside marquee lines can now be removed. Choose the Eraser Tool and carefully erase the remaining excess area. 7. Repeat Steps 5 and 6 for all corners. You will now have a neatly mitered pillow template. Feel free to embellish further if needed. I added a tulip from another design to the center of my pillow. Delete the rectangle spacers. 8. Save your design as a .jpeg and upload to Spoonflower. Choose the fabric you want to print on and double check how it lays out on a yard of fabric. If you are happy with the design, order a sample or yardage. When you receive the yardage, you can simply cut into your pillow squares and sew them together. Now you’ll have an easy custom banded pillow that requires no additional banding or sewing! Once you get the hang of this it becomes addictive. Here I used this same technique to create these matching Roman shades, factoring in the side/bottom hems and top header measurements into the total canvas size. Banding Trim Frequently Asked QuestionsWhat is banding trim?Banding trim is a piece of fabric added to the edge of a fabric surface.What is a no-sew banded layout?A no-sew banded layout is a technique Danika shares in this tutorial where a banding trim-like design is added to a Spoonflower pattern so that when the pattern is printed, the banding trim design is already one with the pattern. This process allows for the easy creation of items such as pillows and draperies that look as though banding trim has been manually added to them.What is banding trim also called? In interior design and home decor, banding trim can also be called banding tape, as the terms refer to a contrasting or different designed edge to a fabric item. Want Actionable Tips on How to Refresh Your Home Decor?3 Trade program interior designers share how you can quickly change your home from blah to huzzah.Read the Post About the Author
Ready to add some extra customization to your interior design? Spoonflower Ambassador Danika Herrick shares how you can add fabric trim to furniture and home decor two different ways! For sewing and design beginners, she'll walk you through creating fabric trim out of Spoonflower designs, which you can sew directly on to items like pillows and draperies. For more experienced designers, Danika explains how to add a no-sew banded layout to your designs using Adobe® Photoshop®. Or if you're feeling adventurous, why not test out both methods? With these next-level creative skills under your belt, you’ll be creating show stopping home decor in no time flat! Pillow and slipcover with added banding trim. Featured design: Custom Blue Charlie Star Stripe by danika_herrick Danika: I love to add a banded trim to my draperies, pillows and furniture. It creates a timeless, tailored look and elevates your project by making it feel custom. There are so many great banding tapes available these days, but they can get outrageously expensive. Quite often one yard of banding costs more than a yard of fabric! I started creating my own homemade banding tape through Spoonflower, using patterns that can be cut and applied directly to my projects. In this double tutorial post, I’ll share both the simple beginner method I use to create yards of banding, as well as a more advanced hack to create templates for custom “no sew” banded pillow and window treatment layouts. Being able to customize designs will give you endless options and level up your designs with very little effort. Featured design: Custom Berry Vine Pink Banding by danika_herrick. Image courtesy of Anne Anderson How to Create Basic Banding Trim Skill Level: Beginner To make basic banding tape you will first want to choose a design. You can design your own or choose from thousands on the Spoonflower Marketplace. Stripes are my go to since they can easily be cut apart and are very straight forward and easy to use. But don’t let that limit you—solids and prints can also work! I highly recommend ordering samples of designs you think might be interesting, then trimming them into strips to test their scale. If the scale isn’t quite right, some Spoonflower designers will adjust the scale of their design if you ask them. Once you have a pattern chosen, determine how much yardage you will need. To do so, measure the perimeter of the banded area and calculate how many strips of fabric you will get from each width of fabric. For small projects like pillows, you can usually get away with ordering one yard of fabric and seaming the strips together. For larger projects like draperies, I suggest ordering fabric the length of the drapery panel so your banding will be one continuous strip with fewer seams. Most average curtains will work with three yards of fabric. Featured designs: Custom Blue Charlie Star Stripe and Large Pearl's Bouquet Quiet Blue Green by danika_herrick Featured design: Custom Blue Charlie Star Stripe by danika_herrick I chose this Star Stripe to create a tailored pillow and banded slipcover skirt for my club chair. To create the banding for the pillows, I need to cut the stripe into strips, leaving 1/2-3/4” (1.27 cm-1.91 cm) extra along each edge to fold under. I use a clear ruler as my guide and cut the fabric with a rotary cutter. Next I fold the edges of the strip under to create a simple blue banding of stars and press it in place with an iron. That’s it! Once I’ve cut and pressed the banding, I attach it to my pillow face. This technique will be the same for any project—whether it’s Roman shades, a duvet, a dust ruffle or draperies. This process requires placing and pinning your newly pressed banding onto your project of choice, just as you would with regular banding tape. If you are doing a straight run of banding with no corners or turns you can skip steps 2 and 3 below as they demonstrate how to create a basic mitered corner. Lay your fabric flat, making sure it is smooth and pressed. I use a clear ruler as a guide to create any inset. I want my banding set 1 1/2” (3.81 cm) in from the pillow’s edge, so I set my guide at 2” (5.1cm), which allows for a 1/2” (1.27 cm) seam. Next I lay the banding in place, pinning it in the center and working out towards the corners. When you get to a corner you will need to make a mitered edge by creating 45-degree folds. Place a pin in the outer corner to hold the fabric steady and fold it back on itself. Next, fold the fabric forward at a 45-degree angle, creating a mitered edge. Pin it in place and press with an iron. Continue pinning the banding to the fabric, repeating this step with each corner. When you get to the last corner, trim your banding to be 3/4” (1.91 cm) longer than needed and hide the unfinished edge into the miter fold. Sew the banding to the face by stitching closely along the edge. I like to use a zipper foot so I can get as close as possible to the edge, working my way all around the entire banding until it is secure. The final result is a crisp banded pillow. How to Design a “No-sew” Banded Layout with Photoshop Skill level: Advanced You might have noticed the stripe pattern I chose for these projects has a lot of space between the stripes. This was an intentional choice because I wanted to leverage that extra space to create an easy skirt for the bottom of my slipcovers. This brings us to the next hack—creating “no-sew” bandings. I could have easily attached the banding to my slipcover’s skirt in the same manner I did the pillow, but because I can customize and create my own designs on Spoonflower, I deliberately spaced my stripes far apart. My chair was going to need an 8” (20.32 cm) skirt, so I simply cut my stripes into 10.5” (26.7 cm) wide strips, hemmed the bottom edge and applied the entire strip as the skirt. I love to use this hack because it saves me so much time sewing! This technique requires spacing the repeat of my stripes to a desired width; it works great for creating dust ruffles and skirting. You can also leverage this idea further to create custom banded pillow and window treatment templates. Please note, this does require some Photoshop skills. Featured designs: Tulip Indienne Stripe Blue Lilac Terracotta and ANDREW STRIPE Cerulean Blue and Berries by danika_herrick I’ll walk you through the basics of creating a banded pillow, but the same rules would apply for a Roman shade or drapery panel. You’ll be creating a canvas the size of your unfinished (unsewn) project and then uploading to and printing it with Spoonflower. 1. Begin by determining your pillow size, including your seams. My finished pillow will be 26” (66 cm) and I will have 1/2” (1.3 cm) seams, so my final size is 27” (68.6 cm). Create a new file in Photoshop in those dimensions being sure to set the resolution to 150 dpi. 2. You will need to create the banding design you want to use prior to this. Save it as the width you want it to print and make sure it is as long as the length of your canvas. I am using my Star Stripe design again and have placed it as a new layer in my file. In Photoshop, the steps to do this are: File > Place Linked > (choose file) > Place. Determine where you want to inset your banding from the fabric or design edge and add in your seams or hems. As I want this banding to be close to my pillow edge, I’m only going to set it in 1” (2.54 cm) from my edges. Using the Rectangle Tool, create a 1” (2.54 cm) wide shape and duplicate it 3 times so that you end up with 4 rectangles. Photoshop steps: Command + J on a Mac/Control + J on a PC x 3. Click each layer and move the rectangles to all 4 sides. I made my rectangles blue so I can clearly see them. 3. Duplicate your stripe layer 3 times. Photoshop steps: Command + J on a Mac/Control + J on a PC x 3. Move and/or rotate each stripe so that it’s aligned against the edge of each rectangle. 4. For stripes containing patterns, you might need to adjust these further for mitered corners. Note how the stars in my corners of the last pictures almost line up, but not quite. I simply click on each stripe and transform them individually, stretching or shrinking them so the corners line up and look neater. 5. Now you need to miter the edges. Using the Polygonal Tool I draw a line through the corner, containing the excess of the top stripe I want to remove. Be sure you have that layer selected and press the “Delete” key. 6. To remove the excess stripe below, click on that layer and then choose Select > Inverse. The area outside marquee lines can now be removed. Choose the Eraser Tool and carefully erase the remaining excess area. 7. Repeat Steps 5 and 6 for all corners. You will now have a neatly mitered pillow template. Feel free to embellish further if needed. I added a tulip from another design to the center of my pillow. Delete the rectangle spacers. 8. Save your design as a .jpeg and upload to Spoonflower. Choose the fabric you want to print on and double check how it lays out on a yard of fabric. If you are happy with the design, order a sample or yardage. When you receive the yardage, you can simply cut into your pillow squares and sew them together. Now you’ll have an easy custom banded pillow that requires no additional banding or sewing! Once you get the hang of this it becomes addictive. Here I used this same technique to create these matching Roman shades, factoring in the side/bottom hems and top header measurements into the total canvas size. Banding Trim Frequently Asked QuestionsWhat is banding trim?Banding trim is a piece of fabric added to the edge of a fabric surface.What is a no-sew banded layout?A no-sew banded layout is a technique Danika shares in this tutorial where a banding trim-like design is added to a Spoonflower pattern so that when the pattern is printed, the banding trim design is already one with the pattern. This process allows for the easy creation of items such as pillows and draperies that look as though banding trim has been manually added to them.What is banding trim also called? In interior design and home decor, banding trim can also be called banding tape, as the terms refer to a contrasting or different designed edge to a fabric item. Want Actionable Tips on How to Refresh Your Home Decor?3 Trade program interior designers share how you can quickly change your home from blah to huzzah.Read the Post About the Author
How-To Add Decorative Trim to Curtains {for cheap} – Jenna Burger Design LLC – Interior Design & Architectural Consulting
:max_bytes(150000):strip_icc()/Screen-Shot-2020-07-02-at-2.19.28-PM-d1457741fb1342498d017ae61011b811.png)
Beach House Dining Rooms

Home Decor Archives - Page 2 of 8
90 Beautiful Living Room Ideas and Decor for a Timeless Look
JRL Interiors — Details Make a Difference - How to Use Trim to Elevate your Design
10 WAYS to Make a High-Ceilinged Room Look Cozier - Kylie M Interiors

Design Tutorials Archives

Design Tutorials Archives
Crown Molding: Is It Right for Your Home?

Top 10 how to add trim to pillows ideas and inspiration
Designers Share the Creative Ways They Use Trim to Amp up Interiors

Edge Supply Birch 3/4 inch X 50 ft Roll of Plywood Edge Banding – Pre-glued Real Wood Veneer Edging – Flexible Veneer Edging – Easy Application Iron-on Edge Banding for Furniture Restoration

Top 10 how to add trim to pillows ideas and inspiration

How to Create Banding Trim and Add It to Furniture and Home Decor
from
per adult (price varies by group size)